


Home Recording Studio Setup: A Step-by-Step Guide for Singer-Songwriters
Posted by Editorial Team on 12th Nov 2026
Last Updated: November 10, 2026
Quick Summary
A home recording studio starts with choosing a quiet room, ideally one with soft furnishings and no hard parallel walls. Next, add an audio interface, a condenser or dynamic microphone, and closed-back headphones, then treat the room with curtains and blankets. Test the room with a single clap before buying any gear.
- Pick the quietest space you have, such as a spare bedroom or living room corner.
- Clap once in the room and listen for a sharp flutter echo to spot problem reflections.
- Choose a two-input audio interface with 48V phantom power for condenser microphones.
- Use closed-back headphones so sound does not leak into the microphone while tracking.
- Record acoustic guitar about 20 to 30 cm away and set peaks around -12 to -6 dBFS.
Table of Contents
- Choosing a Room for Your Home Recording Studio
- Home Studio Acoustic Treatment Tips for Better Vocal Takes
- Choosing the Best Audio Interface for Singer-Songwriters
- Selecting a Microphone, Headphones and Studio Monitors
- How to Record Acoustic Guitar at Home
- Budget Home Studio Setup in Australia: Realistic Tiers
- Your First Recording Session: Next Steps for Your Studio
- Frequently Asked Questions
Choosing a Room for Your Home Recording Studio
A good home recording studio starts with the room, not the gear. Pick the quietest space you have, ideally one with soft furnishings and no hard parallel walls facing each other. Many home studios use a spare bedroom or a corner of a living room.
Avoid small enclosed spaces like wardrobes or bathrooms. These spaces often suffer from poor acoustics and standing waves. Larger rooms with natural diffusion usually give better results for vocals.
What to look for:
- A room away from traffic, fridges and air conditioning noise
- Furniture and curtains that soak up reflections
- Enough space to move the microphone and sit comfortably with your guitar
- A power outlet and a short path to your computer
Test the room before you buy anything. Clap once and listen for a sharp flutter echo. If you hear one, add soft materials to the walls.
Home Studio Acoustic Treatment Tips for Better Vocal Takes
Acoustic treatment controls echoes so your vocals sound clear, not boxy. You do not need a fully treated room to get usable takes.
Start with simple, low-cost steps:
- Hang heavy curtains or blankets on the wall behind and beside you
- Place a rug on the floor to reduce bounce
- Fill bookshelves to break up reflections
- Record in a corner, facing into the room, for a more controlled sound
A common mistake is treating the whole room when only a few spots need attention. Focus on the first reflection points on the side walls and the wall behind the microphone.
Choosing the Best Audio Interface for Singer-Songwriters
An audio interface connects your microphone and instruments to your computer. It turns analogue sound into digital audio and gives you clean preamps for vocals.
Look for these features when you choose one:
- Two inputs so you can record vocals and guitar together
- Phantom power (48V) for condenser microphones
- Low-latency monitoring so you hear yourself without delay
- Compatibility with your computer and recording software
Two-input interfaces suit most singer-songwriters. Buying more inputs than you need only adds cost.
Selecting a Microphone, Headphones and Studio Monitors
Each piece of gear does a different job. Your microphone captures your voice, your headphones let you hear the take while recording, and your monitors let you judge the mix.
Microphone: A large-diaphragm condenser microphone is a common choice for vocals in a quiet room. A dynamic microphone can work better in a less treated space, because it picks up less room sound. Browse matched condenser pairs and vocal microphones at Muzic Man.
Headphones: Closed-back headphones stop sound leaking into the mic while you track. Consumer headphones often colour the sound, which makes mixing harder. Choose a pair designed for studio use.
Studio monitors: Monitors help you hear the mix accurately. Place them at ear height, forming an equilateral triangle with your listening position.
Explore the full range of portable pianos and keyboards that suit home studios at Best Foldable Travel Piano, and compare headphone and monitor options for your setup.
How to Record Acoustic Guitar at Home
Recording acoustic guitar at home involves a short signal chain: the microphone converts sound to an electrical signal, the cable carries it to the audio interface, the interface converts it to digital audio with its preamp, and your computer records it through the digital audio workstation. Each link can cause a specific problem, so it helps to understand the chain before you start troubleshooting.
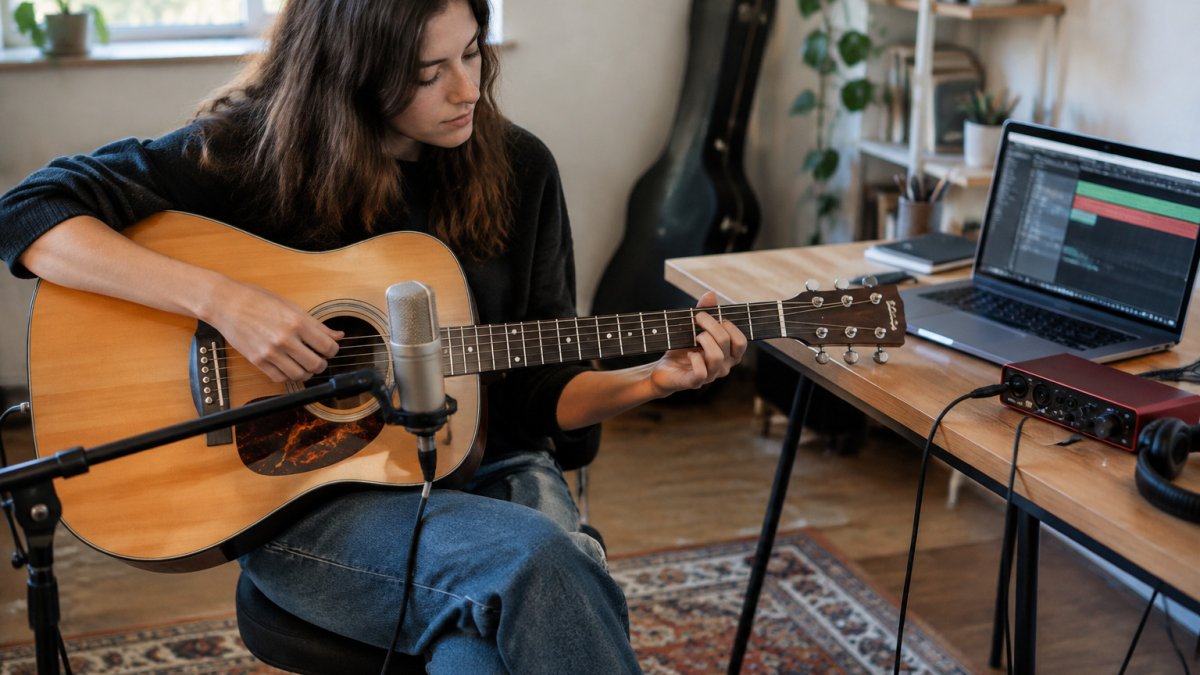
Microphone placement A common starting point is a small-diaphragm or large-diaphragm condenser about 20 to 30 cm from the guitar, aimed at the join between the neck and the body, around the 12th fret. Moving the microphone toward the sound hole brings out more low end and body resonance; moving it toward the neck brings out more string attack and clarity. Move the mic in small steps and listen on headphones before settling. In a room with strong reflections, pointing the microphone slightly away from the wall behind the guitar reduces the boxy sound.
Setting levels Set the preamp gain while the guitarist plays their loudest strumming, and aim for peaks around -12 to -6 dBFS. Leaving that headroom prevents clipping, which is hard digital distortion that cannot be repaired afterwards.
Troubleshooting common faults
- No signal: Check that the input is selected in your software, that the track is armed for recording, and that phantom power is on if you are using a condenser. Swap the cable before blaming the microphone.
- Hum: Usually comes from a ground loop or from a power supply near the signal path. Move the computer and power adaptors away from the cables, and check that the mic cable is not running alongside power leads.
- Latency when monitoring: Use the interface's direct monitoring feature so you hear yourself without the delay of the computer's processing. Lower the buffer size in your software if the delay persists.
- Crackle or dropouts: Often caused by a buffer that is too small for the computer to keep up, or by a USB port shared with other heavy devices.
A repeatable tracking routine Record a short test take first, listen back on your headphones, and adjust one thing at a time, starting with mic position, then level, then room. Keep the takes you like, not only the ones that are technically clean. For a singer-songwriter, the guitar is often recorded first as a guide, with vocals added afterwards, so the same mic position and level should be kept for the whole session.
For a good-sounding acoustic-electric guitar to record with, see the Saga SL65 or the Ashton D20SW. If you are still choosing between professional acoustic brands, read 5 Best Acoustic Guitar Brands for Professionals to compare tone.
The table below sums up the common recording faults covered in the article, with a quick fix for each.
| Fault | Likely cause | Fix |
|---|---|---|
| No signal | Input not selected or track not armed | Check the input and arm the track, then swap the cable |
| Hum | Ground loop or nearby power supply | Move computer and power adaptors away from cables |
| Latency when monitoring | Computer processing delay | Use direct monitoring and lower the buffer size |
| Crackle or dropouts | Buffer too small or shared USB port | Increase the buffer and use a separate USB port |
Budget Home Studio Setup in Australia: Realistic Tiers
A home studio can be built at almost any budget, but the sensible order of spending matters more than the total. Prices for gear vary between retailers and shift over time, so confirm current pricing on the Muzic Man website or with the team before you buy.
Entry tier This tier covers one large-diaphragm condenser or a solid dynamic microphone, a two-input USB audio interface, a pair of closed-back headphones, a microphone stand, and a pop filter. It is enough to record vocals and one acoustic instrument at home. The limit is monitoring: without a treated room, you will be judging your mix on headphones alone, so keep mixing decisions conservative and check your work on a second set of speakers or headphones.
Mid tier Add a pair of nearfield studio monitors, a second input or a small upgrade in preamp quality, and basic acoustic treatment. Acoustic treatment at this level usually means a few absorbent panels or thick blankets placed at the first reflection points, which costs much less than a full treatment job. This is the tier where most singer-songwriters notice the biggest improvement in usable takes.
Upgrade tier Here you can add a second microphone for stereo guitar or harmony layering, better preamps, and more substantial treatment such as bass traps in corners. Returns diminish quickly at this stage, so the upgrade should follow a problem you have actually identified in your recordings.
Where to spend first Put your money into the microphone and interface before anything else, because they set the ceiling on signal quality. Put the next dollars into the room, since a modest mic in a treated space often outperforms an expensive mic in a bare, reflective room. Monitors come after that, once you have a stable recording process.
Watch out: Many Australian homes have hard-floored living areas and tiled bathrooms, so a room that sounds fine in daylight can still ring badly at night when the blinds are closed. Test the room under the conditions you will actually record in.
Your First Recording Session: Next Steps for Your Studio
Start with one song. Set up the room, check your levels, and record a simple vocal and guitar take. Listen back on your headphones, note what sounds wrong, and adjust one thing at a time.
Once your basic setup works, you can add gear and treatment as your needs grow. Muzic Man carries a range of branded musical instruments and supplies, so you can build your setup in stages. Visit our online store or our Gold Coast shop to find the right pieces for your first session.
Frequently Asked Questions
What is the minimum equipment needed for a singer-songwriter home studio?
A basic singer-songwriter home studio needs a computer running digital audio workstation software, an audio interface with at least one microphone preamp, one condenser or dynamic microphone suited to vocals, and a pair of closed-back headphones for recording. Studio monitors are useful for mixing but not essential at the start. Many songwriters begin with a single microphone and interface and add components as their recording needs grow. Pricing varies widely by brand and retailer, so check Muzic Man's website or contact the team for current prices and availability.
Do I need an audio interface to record at home?
Yes, in most cases. A computer's built-in input is usually too noisy and has too little gain for a vocal or acoustic guitar recording. An audio interface converts the microphone signal into a clean digital signal and provides a preamp to boost it. Choose an interface with enough inputs for what you plan to record, and check that it works with your computer and DAW. The best audio interface for singer-songwriters is usually the one that fits your current inputs and budget.
Do I need soundproofing for a home recording studio?
Soundproofing, which stops sound leaving or entering a room, is different from acoustic treatment, which improves how a room sounds inside. Most home songwriters need acoustic treatment more than full soundproofing. Start by choosing a larger room with soft furnishings, then add absorption panels or thick curtains behind the microphone position to reduce echo and flutter. Full soundproofing is costly and usually unnecessary for recording vocals and acoustic guitar.
Is it better to buy a studio bundle or individual components?
A bundle can simplify buying because the interface, microphone and headphones are matched and tested to work together. Individual components let you choose each piece for its specific job, which can produce a better result for your voice and instrument. If you are starting out, a well-chosen bundle is often the easier route. Compare what each option includes, and check current pricing with Muzic Man before you decide.